![]()
How to Use Your Trim Gauge™ to do Door Trim
|
|||
Although there are many uses, the Trim Gauge™ was originally designed for maintaining the same reveal around your windows and doors. Its pre-determined offset is the standard reveal for all doors and windows. Keep in mind that the Trim Gauge™ is a universal tool, meaning that it has right and left hand capabilities. When you slide the Trim Gauge™ forward in one direction it will measure the same in the opposite direction. Note: Prior to using your Trim Gauge™ make sure that the door or window is Plumb. |
|||
|
|
Loosen the thumb screw on the Trim Gauge™ and slide the gauge forward so it is approximately offset 3/4" then retighten thumb screw. | ||
| Place Trim Gauge™ in the upper corner of the door jamb so that the bottom
of the gauge is resting on the jamb, the top part of gauge should protrude over
the jamb. (Click To See Picture) |
|
||
|
|
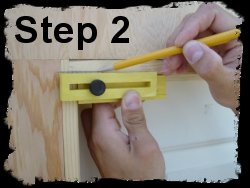
Take a Pencil and draw a line along outer edge of Trim Gauge™. | ||
| Remaining in the same corner reverse the gauge and draw a line on the adjoining
jamb (Click To See Picture).
Note: You should have two intersecting lines. Do this in all corners. |
|
||
|
|
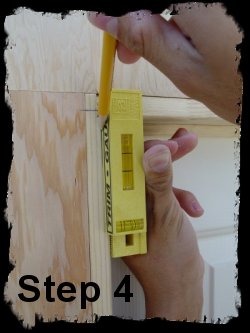
Place the Trim Gauge™ on the jamb and periodically draw short lines down
or across to use as reference point for the placement or your trim. (Click To See Picture) |
||
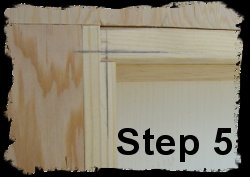
| Now that you have drawn your marks on the jamb simply place your trim on its prospective position and transfer your mark onto your trim piece. |
|
||
|
|
Cut your trim piece on your transferred mark using a 45 deg. cut. Install your trim piece. | ||
| Note: There are several different ways of installing your trim pieces. The recommended method is to start with your side pieces first and do your top last. Since the top piece is generally smaller you will find it easier to work with, in the event minor adjustments are needed. Helpful Hint: |
|||